
CAN bus illumination signal interface
Take the panel-illumination signal off the vehicle network so an aftermarket head unit or display dims with the dashboard at night.
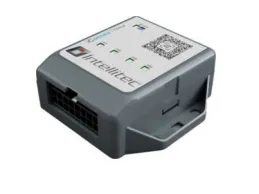
What a CAN bus illumination interface does
A CAN bus illumination interface reads the panel-lighting state on the vehicle network and outputs the illumination signal an aftermarket head unit or display expects. When the vehicle's lights come on and the dash dims, the retrofit screen dims with it.
It replaces the old dash-dimmer wire, which modern vehicles often no longer expose as a simple feed. The interface takes the signal off the CAN bus, so the screen behaves like factory kit without splicing into the dashboard lighting circuit.
Why the illumination feed matters at night
A head unit at full brightness after dark is dazzling and looks like an afterthought. The illumination signal is what tells it to switch to its dimmed night display, and on a modern vehicle that signal lives on the network.
- Dims with the dash: the display drops to night brightness when the vehicle lights come on.
- Reads a digital signal: it works where there's no analogue dimmer wire to tap.
- A tidy install: the feed comes off the network, not from cutting into the dash lighting.
- A factory-look result: the retrofit screen behaves like the vehicle's own displays.
What the illumination signal drives
A correct dimming feed is what makes a retrofit display look and behave like factory.
Aftermarket head units
Switch a retrofit stereo or multimedia unit to its night display with the vehicle lights.
Camera monitors and screens
Dim reversing and camera monitors so they aren't dazzling after dark.
Navigation displays
Match navigation screen brightness to day and night driving.
Switch panels and controls
Illuminate and dim aftermarket switch panels in step with the dash.
Fleet and specialist displays
Keep in-cab displays readable and comfortable across the working day.
Conversion infotainment
A proper dimming feed for infotainment fitted to van and camper builds.
CAN KONTROL lines for illumination and head units
CAN KONTROL NAV(opens in a new tab)
Passes illumination to an aftermarket screen so it dims with the dash, alongside speed, ignition, reverse and park brake.
CAN KONTROL LIGHTS(opens in a new tab)
Reads sidelight, dip, indicator and brake-light state for outputs that follow the vehicle.
Illumination lines at Intellitec MV(opens in a new tab)Compare with CANM8 product names


Fitting a screen that should dim at night?
Tell us the vehicle and the display, and our engineers will confirm the right illumination feed off the CAN bus.
Reference
Fitting a CAN illumination feed for a screen
A head unit that glares at night spoils an otherwise good retrofit. These steps give the screen the dimming signal it expects, taken from the vehicle's own lighting state rather than a dash-dimmer wire that may not exist.
Tools for the job
- Digital multimeter
- Wiring information for the vehicle
- Trim removal tools
- Head unit installation manual
- Pocket torch for checking the dimming at night
Supplies to have ready
- Fuse and holder for the module's supply
- Back-probe connectors for the CAN pair
- Lead for the illumination input
- Tape, ties and labels
- 1
Read the screen's illumination input
Find the illumination or dimmer input in the head unit's manual and note whether it expects a simple on/off level or a varying one. The module's output has to match that, so say which when you order.
- 2
Check the vehicle's lighting behaviour
Sidelights, headlights and daytime running lights don't all raise the panel-lighting state on every vehicle. Switch through each setting with the ignition on and watch the dash, so you know which state you want the screen to follow.
- 3
Find the bus access point
Panel lighting is often on a body network, reachable at a body control module or behind the dash. Where the diagnostic socket sits behind a gateway, the wiring information shows a better point.
- 4
Identify the pair and tap it cleanly
Locate the twisted pair, tag high and low, and confirm it is alive. Connect with back-probes or the no-cut reader and leave the dash dimmer circuit alone.
- 5
Power and earth the module
Feed it from a fused permanent live and earth it to clean metal. Put the fuse close to the source and keep the module away from the heater and demister ducts.
- 6
Connect to the head unit
Take the illumination output to the screen's dimmer input, keeping the lead short and away from audio wiring to avoid noise. If the head unit also needs speed or park-brake, plan those outputs in the same pass.
- 7
Match the configuration
Intellitec configures the module for the vehicle and the head unit before it ships, so list the screen model and the lighting state you want it to follow on the order.
- 8
Tidy and record
Secure the module behind the dash, label the illumination lead and write the lighting setting you tested into the hand-back note.
Night-time checks
- With the ignition on, switch the vehicle lights on and off and confirm the screen dims and brightens with them.
- Step the dash brightness control, if there is one, and see whether the screen follows or only changes at a fixed level.
- Check the daytime running light state: the screen should behave as the lighting state you chose, not flick between modes.
- Look at the screen from the driver's seat after dark and confirm the dimmed level is comfortable.
- Switch off, lock up and confirm the screen and the module have gone quiet once the vehicle sleeps.
How the illumination signal works
It reads the vehicle's lighting state and passes it to the display.
- 1
Connect to the network
The interface joins the CAN bus and reads the panel-illumination message, with no cut into the dash lighting circuit.
- 2
Read the lighting state
It decodes when the side lights or headlights are on for that make and model, and a dimming level where available.
- 3
Output the signal
It provides the illumination feed the head unit expects, as a switched input or a dimming signal.
- 4
Dim the display
The screen switches to its night display when the vehicle lights are on and returns to day brightness when they're off.
Which vehicles it covers
Panel-illumination state is carried on the CAN bus of modern cars, vans and trucks. The interface reads each manufacturer's message in configuration, so one product dims correctly across a mixed fleet.
The common UK van and truck fleet is covered, with firmware maintained in-house. Vehicle electronics have been made by Scorpion in the UK since 1973.
Some head units want a simple on/off illumination input, others follow a dimming level. The interface provides the signal the display is built to read, so the night mode triggers correctly.
On a full retrofit it works alongside the park-brake and reverse feeds, so the screen dims at night, shows the camera on reverse, and enables parked functions, all from clean network signals.
Common fitments include:
Common questions
What is a CAN bus illumination signal?
It is the panel-lighting state read off the CAN bus and output as the illumination feed a head unit expects, so the display dims to its night mode when the vehicle lights come on.
Why won't my head unit dim at night?
It needs an illumination input, and modern vehicles often carry that signal on the network rather than on a dimmer wire. The interface provides the feed the display is looking for.
Does it give an on/off or a dimming level?
It provides the signal the display is built to read. That can be a switched on/off illumination input, or a dimming signal where the head unit follows a level.
Will it work without a dash dimmer wire?
Reading the illumination message off the CAN bus is the route for vehicles that no longer expose an analogue dimmer feed. Whether the message is available depends on the vehicle, so confirm the make, model and year with us.
Can you provide illumination with other signals?
Yes. A multi-output interface can supply illumination alongside park brake, reverse and speed from a single connection. Speak to us about the install.
Why does the screen stay at full brightness at night?
Check the head unit's illumination input first: it may need enabling in its settings. Then test the module's output with a meter while switching the lights. No output change means the lighting message isn't being read, so send us the vehicle details.
Why does it dim on sidelights but not on dipped beam, or the other way round?
Vehicles flag lighting states differently, and the module is configured to follow one of them. Tell us which state the screen should follow and we'll check what the vehicle reports.
Why does the screen flicker when the dash dimmer is turned?
A stepped dimming control can send the signal in stages, and a head unit wanting a simple on/off input will respond jerkily. Check which signal type the screen expects against what the configuration provides.
Why does the screen dim in daylight with the daytime running lights on?
Some vehicles raise the lighting state with daytime running lights. That's a configuration choice, so describe the behaviour you want, and we'll confirm whether the vehicle separates the states.
What if my head unit has no illumination input?
Without one, the module's output has nothing to connect to. Some units offer a software setting that follows another input, so check the manual, or choose a screen with the dimming feature.
Can the same module give speed and reverse as well?
A multi-output line can provide illumination alongside the other head-unit signals. See the multi-output page, then give us the head unit and vehicle so the right line is chosen.
Why did a dash warning appear after I fitted it?
Disconnect the module and see if the warning clears, then inspect the pair connection for damage or moisture. If the warning stays, trim removal may have disturbed another connector.